This is an old post. Some dead links have been replaced and may link to outdated, wrong or no longer active content.
In this article, I would like to present a tutorial to set up buildbot, a continuous integration (CI) software (like Jenkins, drone, etc.), making use of FreeBSD’s containerization mechanism "jails". We will cover terminology, rationale for using both buildbot and jails together, and installation steps. At the end, you will have a working buildbot instance using its sample build configuration, ready to play around with your own CI plans (or even CD, it’s very flexible!). Some hints for production-grade installations are given, but the tutorial steps are meant for a test environment (namely a virtual machine). Buildbot’s configuration and detailed concepts are not in scope here.
Table of contents
- Choosing host operating system and version for buildbot
- Create a FreeBSD playground
- Introduction to jails
- Overview of buildbot
- Set up jails
- Install buildbot master
- Run buildbot master
- Install buildbot worker
- Run buildbot worker
- Set up web server nginx to access buildbot UI
- Run your first build
- Production hints
- Finished!
Choosing host operating system and version for buildbot
We choose the released version of FreeBSD (11.1-RELEASE at the moment). There is no particular
reason for it, and as a matter of fact buildbot as a Python-based server is very cross-platform; therefore
the underlying OS platform and version should not make a large difference.
It will make a difference for what you do with buildbot, however. For instance, poudriere is the de-facto standard for building packages from source on FreeBSD. Builds run in jails which may be any FreeBSD base system version older or equal to the host’s version (reason will be explained below). In other words, if the host is FreeBSD 11.1, build jails created by poudriere could e.g. use 9.1, 10.3, 11.0, 11.1, but potentially not version 12 or newer because of incompatibilities with the host’s kernel (jails do not run their own kernel as full virtual machines do). To not prolong this article over the intended scope, the details of which nice things could be done or automated with buildbot are not covered.
Package names on the FreeBSD platform are independent of the OS version, since external software (as in: not part of
base system) is maintained in FreeBSD ports. So, if your chosen FreeBSD version
(here: 11) is still officially supported, the packages mentioned in this
post should work. In the unlikely event of package name changes before you read this article, you should
be able to find the actual package names like pkg search buildbot.
Other operating systems like the various Linux distributions will use different package names but might also offer buildbot pre-packaged. If not, the buildbot installation manual offers steps to install it manually. In such case, the downside is that you will have to maintain and update the buildbot modules outside the stability and (semi-)automatic updates of your OS packages.
Create a FreeBSD playground
Vagrant is a popular tool to quickly set up virtual machines from pre-built images. We are using it here for simplicity. Any form of test environment or virtual machine would suffice. If you choose to follow along using Vagrant, please install it and ensure you have a compatible hypervisor installed as well in order to run a virtual machine (for instance VirtualBox).
Official and nightly FreeBSD images for Vagrant are available. With the following commands, we create a new directory for the playground virtual machine (called "VM" from here on) and then use Vagrant to download the FreeBSD 11.1-RELEASE image. Ensure you have enough disk space: the image presented here has around 1.4 GB, and you additionally need to allocate space for the VM.
mkdir -p ~/vagrant/freebsd-11.1-buildbot
cd ~/vagrant/freebsd-11.1-buildbot
vagrant init freebsd/FreeBSD-11.1-RELEASE
After vagrant init, the image is available to create new VMs and a Vagrantfile was created in the current directory.
We must edit the file, because the metadata (contained in what Vagrant calls a "box" = disk image + metadata) is
missing two pieces of information: base MAC address and shell (see
bug report). Vagrant’s default shell is bash -l, but FreeBSD
does not ship bash in its base system; hence we use sh. Also, we will disable synced folders as we will not need them
here and they do not work out of the box (literally!). Without the commented sample configurations, the file should
look as follows:
Vagrant.configure("2") do |config|
  config.vm.box = "freebsd/FreeBSD-11.1-RELEASE"
  config.ssh.shell = "/bin/sh"
  config.vm.base_mac = "080027D14C66"
  config.vm.synced_folder ".", "/vagrant", disabled: true
  config.vm.network "forwarded_port", guest: 80, host: 8999
end
Now let’s provision the virtual machine:
vagrant upIf you see messages like Warning: Connection reset. Retrying… for a while, keep hanging on — the official FreeBSD
image defaults to connect to the Internet on first startup in order to fetch and install the latest updates. This
can take a few minutes and several VM reboots.
Once the VM has fully booted, we can drop into a terminal via SSH. Vagrant handles the connection details for us:
vagrant sshRemember we set /bin/sh as shell in the Vagrantfile? Confusingly, Vagrant 2.0.3 needs this setting to work (else
fails while bringing up the virtual machine), but now totally ignores the setting and we find ourselves in csh,
the default configured for the connecting user account 🙄. You can recognize it from its default
vagrant@freebsd:~ % shell prompt (sh uses $ without extra information), or type ps -p $$ to show
details about the shell itself (where $$ resolves to the shell process ID in all popular shells). If you are
more familiar with a different shell, you could for example install and use bash like so:
sudo pkg install bash && chsh && sudo chsh. If you decide to stick to the default terminal csh, ensure you
do not copy-and-paste example shell command lines starting with #, as those are not interpreted as comments
in interactive csh shells.
Introduction to jails
FreeBSD has been supporting the concept of jails since the start of its 4.x release series in the year 2000. This is way before its modern competitors LXC/Docker/rkt and — like most other mechanisms — OS-specific. Some people say that jails are more mature. Since I have not worked with any Linux container mechanisms after OpenVZ many years back, I cannot give any experience or comparison here, and in any case it would probably be apples vs. pears; I like pears when they lay around a little and got soft.
Jails work like a full FreeBSD environment, but access to the outer system’s resources is restricted. For example, a jail may only listen on a network interface and IP address that was assigned to it. Filesystem access and other permissions like mounting of filesystems is (configurably) limited, as well (similar to a chroot environment). The performance difference of running software in a jail vs. directly on the jailhost is usually not noticeable (somewhat related study: packet routing performance analysis by Olivier Cochard-Labbé at EuroBSDcon 2017).
No other operating systems like Linux or Windows can be run in a jail, because the kernel is shared among jailhost (this is what I will call the outer operating system in this article) and all jails. For the same reason, running e.g. FreeBSD 12 in a jail — while the host is still on FreeBSD 11 — might not work because software built for the newer OS version may expect a different kernel interface and crash if run with the older kernel.
Overview of buildbot
Buildbot is a very versatile software. While I mentioned its main use as CI (Continuous Integration) and probably even CD (Continuous Delivery/Deployment) platform, it could theoretically do any automated task that runs on a computer. It’s just so that the "batteries included" are mostly related to building software. If you need something else, you can easily write build steps and other things in your Python-based master configuration file.
The main components to understand are the buildbot master and buildbot worker:
-
buildbot master: component which parses all build configuration and other settings (notification e-mails, change sources such as Git repositories, when builds are triggered/scheduled, etc.) and distributes the actual builds to its workers.
-
buildbot worker: a dumb component which only has connection details as configuration and gets all other commands from the master, namely to run builds. There could be multiple, and in large production setups, it makes a lot of sense to put them onto powerful, separate servers. Ephemeral workers (buildbot calls them "latent workers"), i.e. dynamically created and destroyed instances, are another option and support for several cloud providers and hypervisors is included. In this article, we will start small and set up a single, jailed worker which may be enough for your first steps with buildbot. You can later easily add/move workers somewhere else if you see the need.
Set up jails
Jails are a cheap way to semantically (and security-wise) separate applications or groups of them. If we later want to move the buildbot worker component or clone it, it is easiest to have the worker — and nothing else — in a jail.
We begin by installing ezjail, a very popular and stable wrapper around FreeBSD’s
jail functionality. It makes creation and administration of jails much
easier.
sudo pkg install ezjail
# Create directory structure and "base jail" i.e. extract base
# FreeBSD system to /usr/jails/basejail
sudo ezjail-admin install
Now it’s time to actually create the jails. Since the master offers a web UI and the worker talks to the master, both need IP addresses assigned. For simplicity, we choose local-only addresses here (network 10.0.0.0/24).
Jail networking has several gotchas, one of them being how loopback addresses are handled: namely, when accessing the
IP addresses 127.0.0.1 and ::1 inside the jail, the connection does not end up on the jailhost’s loopback interface
(else jails could access its parent’s services — a security hole), but the kernel rewrites those connections
to the first IPv4/IPv6 address assigned to the jail. If the first assigned IP address is public and a service in the
jail listens on 127.0.0.1:1234, port 1234 will suddenly be publically accessible! Therefore, the
recommended practice is to have a separate network interface
for jails (you could even have one per jail, but in this tutorial we want the jails to communicate with each other
directly). This works by "cloning" lo0 into the new interface lo1.
# Configure a separate network interface for jails
sudo sysrc cloned_interfaces+=lo1

# We can assign an IP to the server ("jailhost") as well. Needed in
# this tutorial so jailhost and jails can communicate (we will
# serve buildbot's web user interface with nginx later).
sudo sysrc ifconfig_lo1="inet 10.0.0.240 netmask 255.255.255.0"

# Create the cloned interface (automatically happens at next boot as
# well, no need to repeat this step)
sudo service netif cloneup


# Set default network interface for jails (if not explicitly configured)
sudo sysrc jail_interface=lo1
# Start ezjail's configured jails on boot
sudo sysrc ezjail_enable=YES
# Actually create our jails
sudo ezjail-admin create -f example master "10.0.0.2/24"
sudo ezjail-admin create -f example worker0 "10.0.0.3/24"
# Start all ezjail-managed jails (will also happen on reboot because
# of ezjail_enable=YES). Please ignore the warning
# "Per-jail configuration via jail_* variables is obsolete" - ezjail
# simply has not been changed yet to use another mechanism.
sudo ezjail-admin start
The jails have successfully started, but to do something useful — like installing packages inside — we want Internet access from within the jails (at least if you decide to use the official source pkg.freebsd.org).
For that purpose, we set up a NAT networking rule using one of FreeBSD’s built-in firewalls (or rather: package
filters), pf.
sudo tee /etc/pf.conf <<EOF
ext_if = "em0" # external network interface, adapt to your hardware/network if needed
jail_if = "lo1" # the interface we chose for communication between jails

# Allow jails to access Internet via NAT, but avoid NAT within same network so jails can
# communicate with each other
no nat on \$ext_if from (\$jail_if:network) to (\$jail_if:network)
nat on \$ext_if from (\$jail_if:network) to any -> \$ext_if
# Note: above two rules split for clarity -> equivalent to this one-liner:
# nat on \$ext_if from (\$jail_if:network) to ! (\$jail_if:network) -> \$ext_if

# No restrictions on jail network
set skip on \$jail_if

# Common recommended pf rules, not exactly related to this article
set skip on lo0
block drop in
pass out on \$ext_if

# Don't lock ourselves out from SSH
pass in on \$ext_if proto tcp to \$ext_if port 22
# Allow web access
pass in on \$ext_if proto tcp to \$ext_if port 80
EOF

# Check firewall rules syntax
sudo service pf onecheck

sudo sysrc pf_enable=YES
sudo service pf start
(mind that $ must be escaped in shells and will land in /etc/pf.conf unescaped)
At this point, your SSH connection will stall (and drop after some time) because the firewall does not have a state
of your existing connection. To drop out from the hanging terminal, press Enter, ~, . one after another.
To understand how this keyboard shortcut closes the SSH session, please read up about escape
characters in the ssh manpage.
Now, please reconnect to the VM with vagrant ssh.
# Check if Internet connection works at all
fetch -o - http://example.com

# Copy resolv.conf to every jail to allow resolving hostnames
# (note: typically added to your default ezjail flavor)
sudo tee /usr/jails/master/etc/resolv.conf < /etc/resolv.conf
sudo tee /usr/jails/worker0/etc/resolv.conf < /etc/resolv.conf

# Check if Internet connection works from a jail
sudo jexec master fetch -o - http://example.com
Install buildbot master
Apart from the master, we want to install the web user interface (called "UI" hereinafter) and Git since that is
used in buildbot’s sample configuration for fetching a source project (the smaller package git-lite should be
enough for fetching of most typical schemes like ssh and https).
sudo pkg -j master install git-lite py36-buildbot py36-buildbot-www
# Alternative which requires installing the tool package manager `pkg`
# itself inside jail:
# sudo jexec master pkg install git-lite py36-buildbot py36-buildbot-www
We create a regular, unprivileged user to run the buildbot master:
# Open a shell inside jail
sudo jexec master sh

# Instead of pw, you can use the interactive command `adduser`. We use a
# random password to protect the account. Since we are always root when
# doing `jexec` into a jail, we can become the user without entering the
# password and therefore can forget which password was automatically generated.
pw useradd -n buildbot-master -m -w random

# Create directory for master
mkdir /var/buildbot-master
chown buildbot-master:buildbot-master /var/buildbot-master

# Become unprivileged user
su -l buildbot-master
buildbot create-master /var/buildbot-master
cp /var/buildbot-master/master.cfg.sample /var/buildbot-master/master.cfg
# Switch to root user again (we did `su -l buildbot-master` earlier)
exit
The sample configuration polls a "Hello world" project every few minutes and builds it on changes. Nothing very interesting here, but it explains the principles quite well.
Time to do configure something useful, right? Not so fast! Without a worker, no build could run. For now, we copied the sample configuration to get started. In the next steps, we permanently run the master and set up a worker to actually run the builds.
Run buildbot master
The built-in mechanism for running buildbot is simply buildbot start. Since this starts the master only once, we
opt for a permanent solution to start on boot. The package maintainers have thought of this and provide an rc script
(such scripts manage service start, stop and other subcommands like restart/reload). It can be executed at boot
(or more exactly in this tutorial: when the jail is started) to bring up the service. For that to happen, we only
have to enable the service permanently and specify its working directory and user:
# Still inside jail shell
sysrc buildbot_enable=YES
sysrc buildbot_basedir=/var/buildbot-master
sysrc buildbot_user=buildbot-master
service buildbot start

# Check log file if you wish
tail /var/buildbot-master/twistd.log
If you are interested how the rc script starts and stops the service, check its code at /usr/local/etc/rc.d/buildbot.
Install buildbot worker
If you are still in the buildbot master jail’s shell, drop out with exit, or alternatively create a new session
to the jailhost with vagrant ssh.
Like for the master, we first install required packages and then create an unprivileged user. Watch out to not mistype
buildbot-master for buildbot-worker — below, we will only execute commands related to the worker. Git is used
in the example builder to fetch the source code for the build. Not to be confused with the GitPoller on the master
which is a "change source" i.e. regularly checks if changes exist in a repository; therefore we need Git on both
master and worker for our example usage.
sudo pkg -j worker0 install git-lite py36-buildbot-worker
# Alternative which requires installing the tool package manager `pkg`
# itself inside jail:
# sudo jexec worker0 pkg install git-lite py36-buildbot-worker

# Open a shell inside jail
sudo jexec worker0 sh

# Instead of pw, you can use the interactive command `adduser`. We use a
# random password to protect the account. Since we are always root when
# doing `jexec` into a jail, we can become the user without entering the
# password and therefore can forget which password was automatically generated.
pw useradd -n buildbot-worker -m -w random

# Create directory for worker
mkdir /var/buildbot-worker
chown buildbot-worker:buildbot-worker /var/buildbot-worker

# Become unprivileged user
su -l buildbot-worker

buildbot-worker create-worker /var/buildbot-worker 10.0.0.2 example-worker pass

# The output told us do perform some actions manually. Let's obey:
cd /var/buildbot-worker
# Please fill in yourself or the admin
echo "Your Name <your.name@example.test>" > info/admin
# Worker description for display in UI
echo "worker0" > info/host

# Switch to root user again (we did `su -l buildbot-master` earlier)
exit|
Note
|
Buildbot workers were previously called "slaves" and due to the politically unsound meaning, Mozilla assigned a $15000 contribution to take care of the rename, which went from documentation all the way down to source code and package names. So luckily, I do not have to write about a "slave in a jail" here 👍. |
Run buildbot worker
We are lucky: buildbot workers do not need any configuration other than the connection details because the master
handles all logic. Workers are "dumb" and only perform builds locally, reporting progress and results back to the
master over the connection we specified (worker connects to master at IP 10.0.0.2 using default port 9989).
Most extensibility of buildbot is in the master (and its master.cfg file). However, flexibility for your actual
build purposes is in the workers as well, since you have the freedom to choose a different operating system,
configuration and installed software for each worker. Since we work with FreeBSD jails in this tutorial, we are
"restricted" to the jailhost’s FreeBSD kernel, but can freely choose any base system and extra packages for the
worker as long as the OS release version is not newer than the host (as mentioned in the introduction).
Similar to the buildbot master rc script, you will probably want to run the worker permanently:
# Still inside jail shell
sysrc buildbot_worker_enable=YES
sysrc buildbot_worker_basedir=/var/buildbot-worker
sysrc buildbot_worker_uid=buildbot-worker
sysrc buildbot_worker_gid=buildbot-worker
service buildbot-worker start
# if it fails with "cannot run /usr/local/bin/twistd", apply this patch from
# https://bugs.freebsd.org/bugzilla/show_bug.cgi?id=227675 to the file
# `/usr/local/etc/rc.d/buildbot-worker` and try again:
# sed -i '' 's|command="/usr/local/bin/twistd"|command="/usr/local/bin/twistd-3.6"|' /usr/local/etc/rc.d/buildbot-worker

# Check log file, should show a message "Connected to 10.0.0.2:9989; worker is ready"
tail /var/buildbot-worker/twistd.log

# Back to jailhost shell
exit
Set up web server nginx to access buildbot UI
Master and worker have been set up, and if you watch log files, activity will be visible:
# On jailhost
$ tail -F /usr/jails/*/var/buildbot*/twistd.log
[...]
2018-04-21 17:23:28+0000 [-] gitpoller: processing changes from "git://github.com/buildbot/hello-world.git"
Here, "processing changes" means that if a change was detected from the previous build, a new build will be triggered. The change source is explicitly connected to trigger a build in the sample configuration — no builds are triggered implicitly only because there is a Git change source; the configuration does only and exactly what you code into it 💪.
There is of course no reason to look into log files to see which build is running. Buildbot features a web-based UI
to give an overview, see results, force-trigger builds and more. In the sample master configuration, the www
component is already set up to serve HTTP on port 8010. In a real environment, you would not serve unencrypted HTTP
or open up the non-standard port 8010 to the outside (mind how listening on port 80 needs superuser privileges).
Also, our server contains more than just the buildbot UI: depending on your actual use case for CI/CD, you may
also want to serve the build logs and artifacts (such as built software). Hence, we serve the UI with nginx (any
other server with HTTP and Web Sockets support would work just as well), and you can later configure yourself which data
you are serving to outside users, allowing everyone to see everything and even to trigger builds. By the way, the
buildbot UI by default does not perform user authorization. HTTPS is not covered in this tutorial — we will use
plain HTTP for test purposes. Nevertheless, the nginx configuration presented below works if you enable SSL/TLS.
# On jailhost
sudo pkg install nginx

sudo tee /usr/local/etc/nginx/nginx.conf <<EOF
events {
    worker_connections 1024;
}
http {
    include           mime.types;
    default_type      application/octet-stream;
    sendfile          on;
    keepalive_timeout 65;
    server {
        listen 80;
        server_name localhost;

        location / {
            root /usr/local/www/nginx;
            index index.html index.htm;
        }

        location /buildbot/ {
            proxy_pass http://10.0.0.2:8010/;
        }
        location /buildbot/sse/ {
            # proxy buffering will prevent sse to work
            proxy_buffering off;
            proxy_pass http://10.0.0.2:8010/sse/;
        }
        # required for websocket
        location /buildbot/ws {
            proxy_http_version 1.1;
            proxy_set_header Upgrade \$http_upgrade;
            proxy_set_header Connection "upgrade";
            proxy_pass http://10.0.0.2:8010/ws;
            # raise the proxy timeout for the websocket
            proxy_read_timeout 6000s;
        }

        error_page 500 502 503 504 /50x.html;
        location = /50x.html {
            root /usr/local/www/nginx-dist;
        }
    }
}
EOF

sudo sysrc nginx_enable=YES
sudo service nginx start
(mind again that $ is escaped in the shell but not in the output file)
Remember the line config.vm.network "forwarded_port", guest: 80, host: 8999 in our Vagrantfile? Vagrant’s networking
is a little different in that access to a VM’s TCP ports is not directly possible, but typically achieved by a
port forward which Vagrant establishes for you. You should therefore see a welcoming nginx example page at
http://localhost:8999/ (open in your computer’s browser).
Let us replace the page with an index of what’s on the server — the buildbot master is already active, while as mentioned, other items like serving build artifacts or logs might become important to you later (not in scope of this tutorial).
sudo tee /usr/local/www/nginx/index.html <<EOF
<html>
<body>
<a href="/buildbot/">buildbot</a>
<!--
    Since there's only one thing here right now, let's redirect automatically
    until you figure out which artifacts you want to put here.
-->
<script>
    window.location.href = "/buildbot/";
</script>
</body>
</html>
EOF
Run your first build
Reload the browser page. The buildbot UI should come up.
There will be a warning about the configured buildbotURL because we use Vagrant’s port forwarding; in production, you
should have direct access to https://your-ci.your-company.example.com and configure the value accordingly.
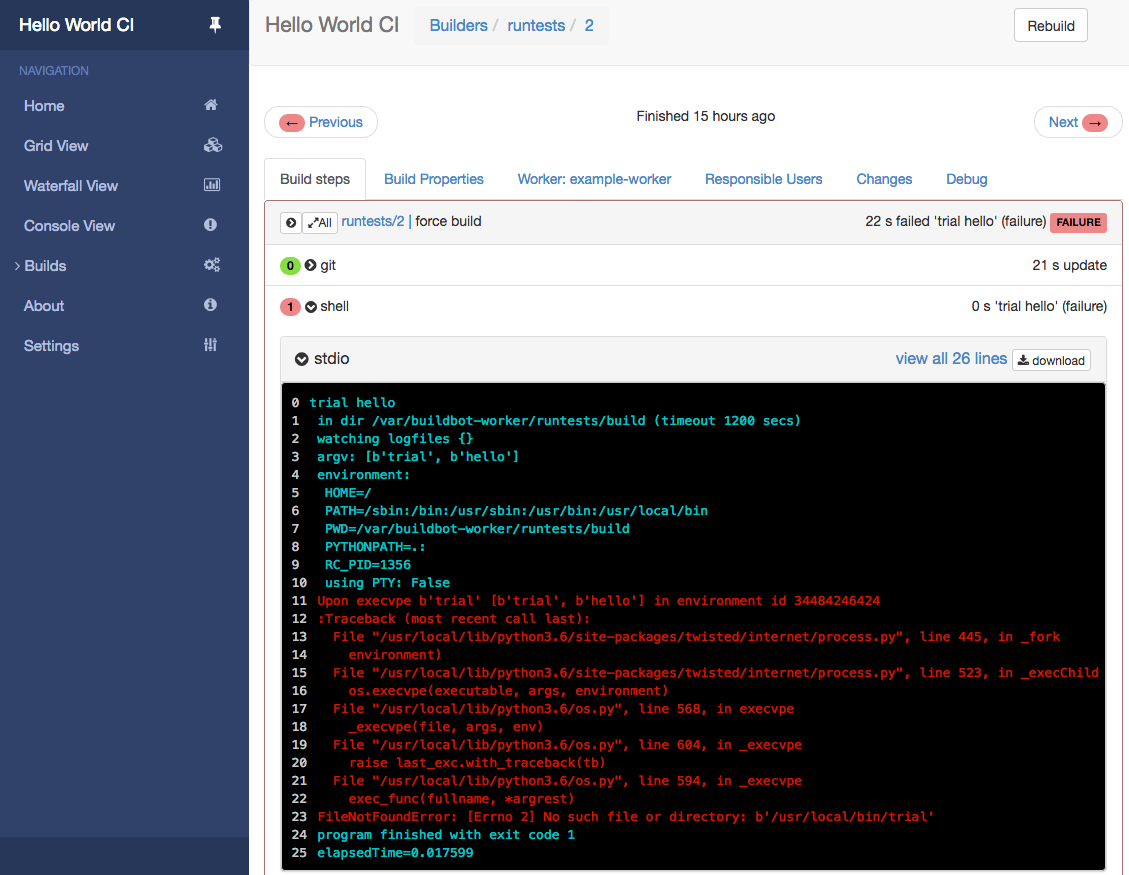
Feel free to browse around the UI. You will find the example builder runtests, our single worker on host worker0
and some other information already available. Since the example builder has a "force" scheduler configured, you
can even trigger a first build now! Click "Builds > Builders > runtests > force > Start Build" and see how the
build runs. It will fail when trying to run trial, the example project’s test runner because we have not
installed this software on the worker (at time of writing, it was not available as separate FreeBSD package).
We are now ready to do something useful with our buildbot instance. Buildbot configuration and essentials
are not covered in here — please read the official documentation
to get started. The configuration at /usr/jails/master/var/buildbot-master/master.cfg is right at your
fingertips and ready for editing. Here is an edit-and-reload workflow that you may need as
"trial and error" strategy until you have successfully learned all the basics:
# Open a shell inside jail
sudo jexec master sh
# Make some changes and reload
vi /var/buildbot-master/master.cfg
service buildbot reload
The rc script’s reload command actually calls something like buildbot reconfigure /var/buildbot-master under the
hood, telling our master process to reload the configuration.
Production hints
We worked in a test virtual machine for this setup, but for production grade, you may still want to adapt a few things:
-
Think about using ZFS as filesystem so ezjail can take advantage of it (see manpage’s Using ZFS section). Official Vagrant images of FreeBSD are set up using UFS, not ZFS.
-
In my company, I have set up buildbot to run package builds using poudriere. Poudriere performs clean builds by means of creating empty jails ("empty" = only FreeBSD base system installed but no packages) and starting the build within. For that to work within our buildbot worker jail, you need to allow it to create subjails, among other settings. At some point, especially if you are a friend of human-readable names and paths, you may run into the current FreeBSD mount point name length limit of 88 characters which will be fixed in FreeBSD 12. To work around that limitation now, you could set
ezjail_jaildir=/jin ezjail.conf (before runningezjail-admin install) instead of using the longer path/usr/jails. Or you could choose shorter jail names likew0instead ofmy-cool-project-worker0-freebsd-10.3. -
Store the worker password in a separate file instead of hardcoding it in
master.cfg(as done in the sample configuration). This allows you to share the configuration with software developers (e.g. commit to a version-controlled repo) or even allow them to edit it — without any security concerns. -
You should replace the sample worker name and password with own values, obviously.
Finished!
The tutorial narrated about basics of FreeBSD jails and buildbot, followed by the setup of a test virtual machine featuring a buildbot master and single attached worker. With this in place, you can go on to implement your CI/CD intentions with buildbot’s explicit and programmable configuration. Good luck!